

To troubleshoot auto electrical problems, begin by inspecting the battery and checking for loose connections. Use a multimeter to test the battery charge and examine the alternator for issues.
Car electrical glitches can be both perplexing and frustrating. Diagnosing these issues often starts with basic steps like ensuring that your vehicle’s battery is fully charged and free of corrosion. A firm connection in the electrical system is critical, as even the smallest disconnection can lead to significant malfunctions.
Utilizing a multimeter provides a clear insight into the electrical health of your vehicle, which includes the battery and alternator performance. Mastering the basics can lead to a smoother diagnostic process, enabling you to either resolve the problem yourself or provide clear, concise information to a professional.
This foundational knowledge not only saves time and money but also extends the life of your vehicle’s electrical components. Always remember, a methodical approach and a keen attention to detail will go a long way in troubleshooting electrical issues within your automobile.
Troubleshooting Auto Electrical Problems
Whether you’re a car enthusiast or simply rely on your vehicle for daily transportation, encountering electrical issues can be a frustrating experience. Modern automobiles are increasingly dependent on complex electrical systems.
From starting the engine to charging your smartphone, every aspect of your driving experience is connected to the vehicle’s electrical infrastructure. Understanding how to troubleshoot these problems can save you time and money, ensuring you stay safe and your vehicle remains reliable.
Common Symptoms Indicating Electrical Issues
Identifying the early signs of electrical problems can prevent more significant troubles down the road. Look out for these common symptoms:
- Dimming or flickering lights: This could indicate a problem with the alternator or battery.
- Dead battery: If your car won’t start, the battery could be discharged or faulty.
- Blown fuses: Frequent fuse blowouts point to an electrical short somewhere in the system.
- Strange smells or smoke: A short circuit can cause a burning smell or even visible smoke.
- Error messages: Modern cars will display dashboard alerts for various electrical issues.
To pinpoint the problem, perform a thorough visual check of the battery terminals for corrosion, scan for error codes using an OBD2 scanner, and check if the alternator belt is intact and functioning properly. Conducting regular maintenance and promptly addressing any irregularities can avoid further damage and costly repairs.
When To Seek Professional Help
While some common electrical issues can be diagnosed and resolved with a bit of automotive knowledge and a handful of tools, more complex problems require professional attention. Consider consulting an expert if you encounter:
- Continual electrical faults: Persistent issues often need advanced diagnostic tools.
- Complex onboard systems: Hybrid and electric vehicles, in particular, have intricate electrical systems that benefit from specialized knowledge.
- Multiple failing systems: When several electrical components fail simultaneously, the cause may be difficult to isolate without training.
In these situations, it’s crucial to seek help from a certified mechanic or a dedicated auto electrical specialist. They have the expertise and equipment to safely and accurately diagnose and repair the issue. This not only saves you from guesswork but also ensures your vehicle’s electrical system operates as intended, maintaining its performance and safety features.
Quick Fixes For Electrical Glitches

Experiencing electrical issues in your vehicle can be both frustrating and puzzling. Yet the good news is that many of these electrical glitches can sometimes be quickly fixed with a bit of knowledge and handy work.
Before you decide to take your car to a mechanic, consider a few DIY tricks that could swiftly get your vehicle’s electric systems back in order. This section will explore simple quick fixes for electrical glitches, starting with basic diagnostic methods and moving on to the tools you’ll require to tackle these issues yourself.
Simple Diagnostic Techniques
Identifying the root cause of an electrical problem can often be the most challenging part. However, by applying some simple diagnostic techniques, you can gain insights into the potential issues without needing advanced equipment.
Start with a thorough visual inspection. Look for obvious signs of damage like frayed wires or burnt fuses. Check if your battery terminals are corroded, which could lead to poor electrical contact.
Pay attention to your dash. Are warning lights coming on? They’re designed to alert you when something’s amiss. Next, consider the circumstances under which the glitch occurs. Is it only when starting the car, or do electrical components cut out while driving?
Tools You’ll Need For Diy Repairs
When tackling auto electrical repairs, having the right tools on hand is crucial for both safety and effectiveness.
- Digital Multimeter – To test the voltage and continuity of electrical circuits.
- Wire Stripper/Crimper – Essential for handling wiring connections.
- Screwdrivers – Flathead and Phillips for removing panels or components.
- Electrical Tape – For insulating repaired wires or connections.
- Fuse Puller – Makes removing and inspecting fuses easier and safer.
With these tools at your disposal, most electrical issues can be addressed. Remember to always disconnect the battery before you start any work and to refer to your vehicle’s manual for specifics about the electrical system.
Strategies For Dead Battery Issues
A dead battery can catch any driver off guard, leaving you stranded with an unresponsive vehicle. Understanding the strategies to troubleshoot a dead battery is essential to get back on the road swiftly and safely. In this section, we’ll explore reliable methods to test your battery’s health, procedures for jumpstarting your car, and guidelines on when to replace the battery.
Testing Your Battery’s Health
Before considering a replacement, checking your battery’s condition is crucial. Perform a voltmeter test to assess the battery’s charge. A healthy battery should measure around 12.6 volts when the car is off. A reading below 12.2 volts indicates a low charge, warranting immediate attention.
Many auto parts stores offer free battery testing. Utilize these services to get a comprehensive battery status report. This can help determine whether the issue is with the battery itself or another electrical component in your car.
Jumpstarting And When To Replace
If your car fails to start due to a dead battery, jumpstarting is often the immediate solution. Ensure you have a set of reliable jumper cables and a second vehicle with a functional battery, or a portable jump starter. Follow these steps to initiate a jumpstart:
- Position the donor vehicle close enough so the jumper cables can easily reach both batteries.
- Turn off both vehicles and connect the red cable to the positive terminal of the dead battery and then to the donor battery’s positive terminal.
- Connect the black cable to the negative terminal of the donor battery, and attach the other end to an unpainted metal surface on your car’s engine block.
- Start the donor vehicle, and then attempt to start your car. Allow the engine to run for several minutes after starting to help charge the dead battery.
- Carefully disconnect the cables in the reverse order of attachment. Avoid touching the cable ends together during the process.
If jumpstarting doesn’t help, or if the battery fails repeatedly, this could indicate the need for a replacement. Typical signs include an engine that cranks slowly, or headlights that dim significantly when the engine is idling.
Vehicles often require a new battery every 3 to 5 years, but this can vary based on usage, climate, and vehicle type. Pay attention to performance dips and replace the battery promptly to avoid being caught off guard by electrical problems.
Note: Always consult your vehicle’s manual for specific instructions and safety precautions related to your car’s electrical system.
Unraveling Dashboard Light Mysteries
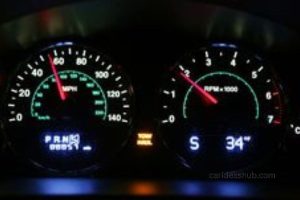
Your car’s dashboard is a communication hub that alerts you to potential problems with various electrical and mechanical systems. Understanding the colored codes and symbols can be the difference between a minor fix and a major repair down the road. Let’s explore the language of dashboard lights to keep your vehicle running smoothly and safely.
Decoding Warning Signals
When the dashboard lights up like a Christmas tree, it’s time to pay attention. Each illumination is your car’s way of communicating issues ranging from engine troubles to something as simple as a loose gas cap. Colors and icons provide the first clue:
- Red lights usually suggest urgent attention is needed.
- Yellow or orange signals are typically advisory warnings.
- Blue or green lights are generally informational indicators.
Crucial to note are lights such as the engine oil pressure warning, charging system light, or brake system alert, which require immediate attention to prevent costly damage.
Addressing The Most Common Alerts
Some dashboard alerts come up more often than others. Here are the most common ones and what they signify:
| Icon | Meaning | Action Required |
|---|---|---|
| Check Engine Light | Engine or emission system issues | Get the car diagnosed as soon as possible |
| Battery Alert | Charging system failure | Inspect battery terminals and alternator |
| Oil Pressure Light | Low oil pressure | Stop the vehicle and check oil levels |
| Tire Pressure Warning | Tire(s) may be under-inflated | Check and adjust tire pressure |
| Coolant Temp Warning | Engine is overheating | Pull over safely and let the engine cool down |
Regular vehicle maintenance and early identification of dashboard indicators can avert prolonged damage to your car. Always consult your vehicle’s manual or a professional mechanic for accurate diagnostics and repairs.
Tackling Fuses And Connections
When your car’s electrical system goes haywire, the problem often lies in the smallest components: the fuses and connections. These tiny heroes play a massive role in ensuring that electricity flows correctly and that your vehicle’s electronic features function without a hitch.
Understanding how to tackle fuses and connections is crucial for any driver looking to maintain their vehicle’s electrical system efficiently. Let’s delve into methods to identify fuse issues and maintain clean, secure battery terminals.
Locating And Assessing Fuse Issues
Hunting down a faulty fuse is often the first step in troubleshooting electrical problems in your car. Fuses are designed to protect electrical circuits by breaking the connection if the current is too high, preventing damage to components. Follow these steps to locate and assess fuse issues:
- Consult the manual: Your vehicle’s owner’s manual contains a map of the fuse box, showing you exactly where to find each fuse.
- Identify the faulty fuse: A blown fuse is often visible through its clear plastic top; a broken or burned wire inside indicates a problem.
- Test for continuity: Using a multimeter, check for continuity; if there’s no beep or zero resistance, the fuse needs replacement.
- Replace if necessary: Gently remove the blown fuse with a fuse puller and insert a new one that matches the amperage ratings.
Keep in mind that recurring fuse blows may indicate underlying issues that require professional attention.
Cleaning And Securing Battery Terminals
Strong connections are key to a stable electrical system, and this begins with the battery terminals. Dirty or loose terminals can cause starting problems, electrical failures, and reduced battery life. Here’s how to maintain them:
- Turn off the engine: Always work on the battery with the engine turned off for safety.
- Remove terminal connectors: Loosen the bolts and remove connectors, starting with the negative terminal to reduce the risk of short circuits.
- Clean the terminals: Use a mixture of baking soda and water to clean corrosion. An old toothbrush or terminal cleaning brush can scrub away residue.
- Rinse and dry: After cleaning, rinse with water and dry with a clean cloth.
- Reattach and tighten: Place the terminal connectors back, starting with the positive terminal, and tighten the bolts securely.
Regular maintenance prevents buildup and ensures optimal connection. Use anti-corrosion washers or a protective spray to prevent future corrosion.
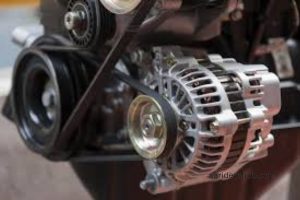
Starter Motor And Alternator Solutions
Experiencing trouble when turning the ignition key or hearing a flickering sound from under the hood? Your vehicle’s electrical health is pivotal for a reliable performance. Two critical components in this system are the starter motor and alternator. When these parts fail, your vehicle might not start or it could leave you stranded with a dead battery. Dive into common issues and practical solutions for keeping your starter motor and alternator in top condition.
Identifying Starter Motor Malfunctions
The starter motor is akin to the heart’s first beat; it gets your engine running. When it falters, so does your vehicle’s ability to start. Symptoms of a faulty starter include a clicking sound when turning the key, the engine not cranking, and intermittent issues when starting the car. To accurately diagnose a starter issue, consider the following steps:
- Inspect electrical connections: Ensure the battery cables and starter connections are tight and corrosion-free.
- Test the battery: A weak battery can mimic starter problems. Verify it has a full charge and can deliver adequate starting power.
- Check the starter relay: Use a multimeter to test for continuity. A lack of continuity suggests the need for a replacement.
- Bench test the starter: An off-vehicle test can confirm the functionality of the starter motor itself.
Checking And Maintaining The Alternator
A robust alternator is vital for charging the battery and powering the electrical system while your vehicle is running. Signs of an ailing alternator include dimming lights, a battery warning light on the dashboard, or unusual noises. Proper maintenance and checks will save you from sudden breakdowns. Follow these guidelines to ensure a healthy alternator:
- Visually inspect the alternator belt: Look for cracks or fraying. A worn belt can reduce alternator efficiency or break, causing a sudden shutdown.
- Check the belt tension: A belt that’s too tight or too loose can damage the alternator’s bearings and reduce its longevity.
- Listen for strange noises: Rattling or grinding sounds can indicate internal wear or bearing failure.
- Measure alternator output: Use a multimeter to ensure the alternator produces an output between 13.5 and 14.5 volts.
Replace faulty components promptly: Addressing alternator issues early prevents further electrical system damage and potential vehicle breakdowns. If the alternator tests below the required voltage, consider repairing or replacing it to avoid future complications.
Frequently Asked Questions Of Troubleshooting Auto Electrical Problems
What Are Common Auto Electrical Issues?
Auto electrical problems often include a dead battery, faulty alternator, bad starter motor, flickering lights, and electrical shorts. Regular maintenance can prevent some issues, but early diagnosis is key to avoiding larger repairs.
How To Identify A Car Electrical Problem?
To diagnose car electrical issues, check for dimming lights, unusual battery drain, or a smell of burning plastic. Using a multimeter to test the battery and alternator can identify charging problems. Professional assistance may be needed for complex diagnoses.
What Causes Car Electrical Failures?
Electrical failures in cars can stem from a dying battery, corroded connections, damaged wires, faulty fuses, or a malfunctioning alternator. Regular wear and tear or exposure to extreme temperatures often contributes to these issues.
How To Fix An Electrical Short In A Car?
Fixing an electrical short requires locating the affected circuit first. Once identified, inspect for exposed wires, check the condition of insulation, and replace any damaged fuses or wires. For safety, it’s advised to consult a professional auto electrician.
Conclusion
Mastering the art of diagnosing and resolving auto electrical problems can save you time and money. Equipped with the knowledge from this post, you’re now better prepared to tackle issues with confidence. Remember, regular maintenance is key. Drive safely and keep your vehicle’s electrical system in top shape!
1 thought on “Troubleshooting Auto Electrical Problems: Quick Fixes”