
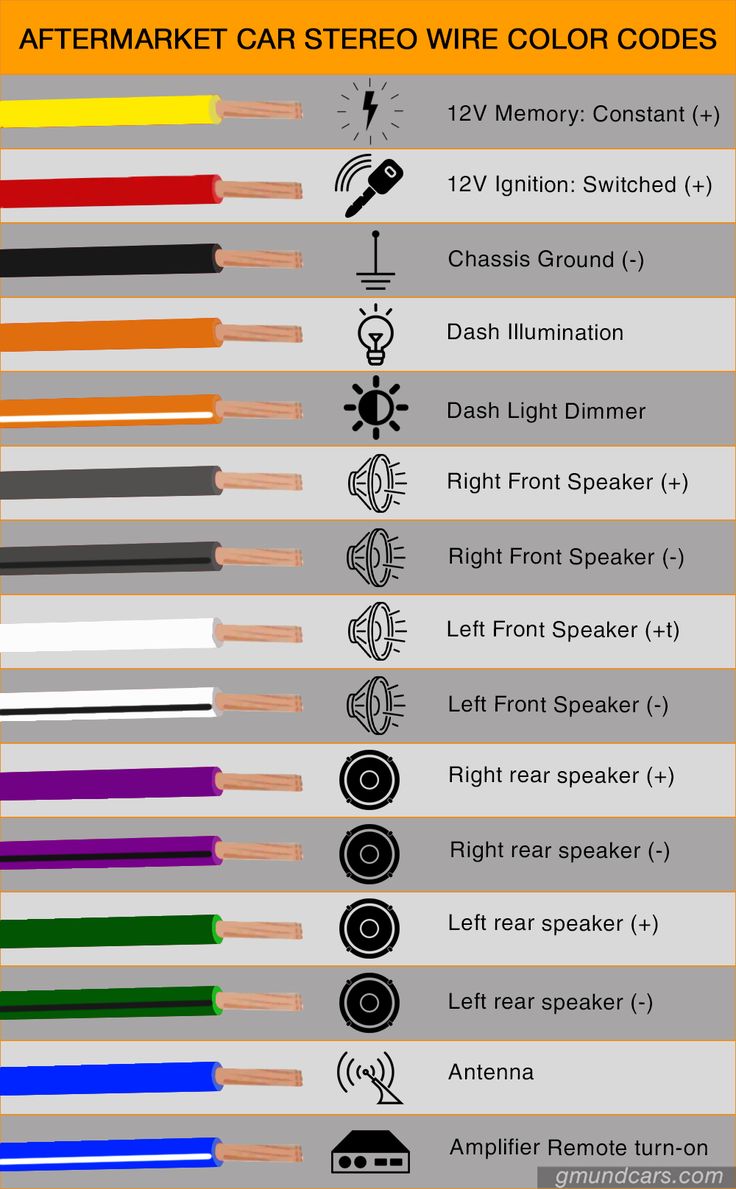
The color code for tail light wiring typically follows a standard pattern, with red for brake lights, yellow for turn signals, and white or grey for the ground wire. Understanding the color coding for your specific vehicle model is crucial for proper installation and maintenance.
When it comes to working with tail light wiring, accuracy is key. Knowing the color code for the wiring helps ensure safety and compliance with regulations. With red indicating brake lights and yellow for turn signals, it’s important to follow the standard color coding for tail light wiring.
Additionally, white or grey wires are typically used for the ground connection. This information plays a crucial role in maintaining the functionality and safety of your vehicle’s tail lights, making it an essential aspect of automotive maintenance.
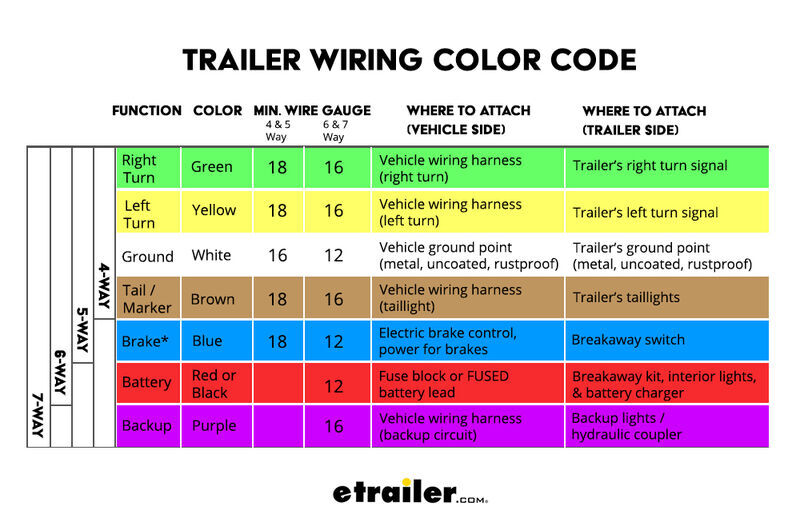
Credit: www.etrailer.com
The Importance Of Proper Tail Light Wiring
Proper tail light wiring is a crucial aspect of vehicle safety and functionality. Whether you are installing new tail lights or working on repairs, understanding the color code for tail light wiring is essential for ensuring everything operates as it should.
Preventing Electrical Issues
Using the correct color code for tail light wiring helps to prevent electrical problems in your vehicle. By following the wiring guidelines, you can reduce the risk of short circuits, overheating, and other electrical issues that could affect the functionality of your tail lights.
Ensuring Safety On The Road
Proper tail light wiring is directly related to the safety of your vehicle on the road. All components within the wiring system must be in place and connected according to the correct color code to ensure optimal visibility for other drivers, especially in low light or adverse weather conditions.
Understanding The Standard Color Code
The standard color code for tail light wiring provides a clear guide for understanding the different wire functions. It ensures efficient installation and troubleshooting of tail lights, making it easier for individuals to work with the wiring system.
Understanding the Standard Color Code
When it comes to tail light wiring, understanding the standard color code is essential. The color code provides a standardized system that allows you to easily identify and connect the wires for different functions of your tail lights. By knowing the color code, you can ensure a safe and efficient wiring setup for your vehicle.
H3: Red for Stop and Turn Signals
One of the key colors in the tail light wiring color code is red. Red is used for stop and turn signals, indicating to other drivers when you are braking or turning. This color plays a crucial role in ensuring safety on the roads. When connecting wires for stop and turn signals, always remember that red is the way to go.
H3: Yellow for Left Turn and Hazard Signals
Another important color in the tail light wiring color code is yellow. Used specifically for left turn and hazard signals, yellow wires indicate the intention to turn left or when there is a hazard on the road. It is important to have a clear understanding of which wires are yellow to ensure the proper functioning of your vehicle’s left turn and hazard signals.
H3: Green for Right Turn and Hazard Signals
Similar to yellow, green is also a significant color in the tail light wiring color code. Green wires are used for right turn and hazard signals. They indicate the intention to turn right or when there is a hazard on the road. When connecting the wires for your right turn and hazard signals, be sure to identify and use the green wires.
H3: Brown for Tail and Running Lights
When it comes to tail and running lights, brown is the color you should be looking for in the tail light wiring color code. Brown wires are used to power these lights, ensuring that your vehicle is visible to other drivers in low light conditions or at night. Properly identifying and connecting the brown wires is essential for the safe operation of your tail and running lights.
H3: White for Ground
The last color in the tail light wiring color code is white. White wires are used for the ground connection. They provide the necessary grounding for the electrical system of your tail lights, making sure everything works smoothly. When working with tail light wiring, don’t forget to identify and connect the white wires for grounding purposes.
To summarize, understanding the standard color code for tail light wiring is crucial for a well-functioning and safe electrical system in your vehicle. By following the color code and connecting the wires correctly, you can ensure that your stop and turn signals, left and right turn signals, tail and running lights, and ground connections are all properly set up. So, whether you are replacing your tail lights or working on a wiring project, remember the color code and create a reliable and efficient electrical setup.
Common Wiring Mistakes To Avoid
When it comes to wiring tail lights, it’s important to avoid common mistakes that can lead to malfunctioning lights or even dangerous situations on the road. From incorrect color coding to inadequate insulation, understanding these common errors can help you ensure that your tail lights are properly wired and functioning correctly. In this section, we will discuss each of these mistakes in detail, providing you with the knowledge you need to avoid them.
Incorrect Color Coding
One of the most prevalent wiring mistakes when it comes to tail lights is incorrect color coding. Each wire in the tail light system has a specific purpose, and using the wrong colors can cause confusion and lead to potential electrical issues. It is crucial to follow the manufacturer’s instructions or a reliable wiring diagram to correctly identify the colors for each wire.
Here are some common color codes you may encounter:
| Wire Color | Purpose |
|---|---|
| Black | Ground |
| Brown | Tail Lights |
| Yellow | Left Turn Signal |
| Green | Right Turn Signal |
| Red | Brake Lights |
It’s important to note that different vehicles may have slight variations in color coding, so always double-check the specific wiring guide for your vehicle model.
Improper Splicing And Connection
Another common mistake when wiring tail lights is improper splicing and connection. It’s crucial to ensure that all connections are secure and well-insulated to prevent loose wires and potential short circuits.
Here are some tips to ensure proper splicing and connection:
- Use appropriate connectors, such as butt connectors or heat-shrink connectors, to securely join wires together.
- Thoroughly strip the insulation from the wire ends before making connections.
- Twist the exposed wire strands together before inserting into the connector, ensuring a solid connection.
- Apply heat to heat-shrink connectors to create a tight seal around the wires.
Inadequate Insulation
Inadequate insulation is another major wiring mistake that can have serious consequences. Insulation protects the wires from moisture, vibration, and other external elements that can cause damage or electrical shorts. Without proper insulation, you may experience intermittent light operation or even electrical fires.
Here are some key points to remember when it comes to insulation:
- Ensure that all wires are properly insulated using electrical tape or heat shrink tubing.
- Inspect the insulation regularly for signs of wear, such as cracks or fraying, and promptly repair or replace any damaged sections.
- Keep the wires neatly organized and away from sharp edges or moving parts to prevent unnecessary wear and tear on the insulation.
By avoiding these common wiring mistakes – incorrect color coding, improper splicing and connection, and inadequate insulation – you can ensure that your tail lights are wired correctly and operating safely. Taking the time to understand and address these errors will not only save you from potential headaches down the road but will also keep you and others on the road safer.
Choosing The Right Wiring Materials
When it comes to wiring your tail lights, choosing the right materials is crucial for a safe and efficient installation. Not only will the quality of wires and connectors affect the overall performance, but factors such as proper gauge and weather resistance can also make a significant difference. Let’s explore these considerations further.
Quality Of Wires And Connectors
High-quality wires and connectors are essential for reliable tail light functionality. Inferior materials can lead to poor electrical conductivity, resulting in dim or flickering lights. Opting for trusted brands and reputable suppliers ensures that the wires and connectors are durable and have excellent conductivity.
Using cheap or substandard wires may also introduce safety hazards, such as the risk of overheating, short circuits, or even fires. When selecting the wiring materials, prioritize quality over cost savings to ensure the longevity and safety of your tail lights.
Proper Gauge For The Application
The gauge of the wire refers to its thickness, and it plays a crucial role in determining the maximum amount of electrical current it can handle. Selecting the appropriate gauge for your tail light wiring is essential to prevent voltage drops and ensure uninterrupted power supply to the lights.
For most tail light applications, 14 or 16 gauge wires are typically sufficient. However, larger gauge sizes may be necessary for heavy-duty applications or vehicles with larger electrical demands. Consulting the manufacturer’s guidelines or seeking professional advice can help you determine the proper gauge for your specific tail light setup.
Weather Resistance
Tail lights are exposed to various weather conditions, including rain, snow, and extreme temperatures. Choosing wiring materials with adequate weather resistance is crucial to protect against moisture, corrosion, and damage caused by exposure to the elements.
Look for wires and connectors that are designed to withstand harsh weather conditions. Waterproof connectors and wires with protective coatings are excellent options to ensure the longevity of your tail light wiring.
Additionally, consider using heat shrink tubing or electrical tape to provide an extra layer of protection against moisture and environmental factors. Proper weatherproofing will help maintain the integrity of your tail light wiring for years to come.
Step-by-step Guide For Proper Connection
This step-by-step guide provides a clear color code for tail light wiring, ensuring a proper and hassle-free connection. Follow these guidelines to achieve a seamless and efficient installation process.
Connecting the tail lights of your vehicle may seem like a daunting task, but with the right color code and a step-by-step guide, it can be a straightforward process. Follow these simple instructions to ensure a proper connection for your tail light wiring.
Identifying The Correct Wires
Before attempting to connect your tail lights, the first step is to identify the correct wires. This is crucial to ensure the proper functioning and synchronization of your vehicle’s tail lights. To do this, refer to your vehicle’s owner’s manual or wiring diagram to determine the exact color codes for your particular make and model.
Once you have determined the correct color codes, locate the corresponding wires behind the tail light assembly. Typically, there will be multiple wires, each with a specific function such as brake lights, turn signals, or parking lights. Using a voltage tester or multimeter, you can easily verify the correct wires by testing their conductivity.
Strip, Crimp, And Connect
After successfully identifying the correct wires, the next step is to prepare them for connection. Start by carefully stripping the insulation from the end of each wire using wire strippers. Be cautious not to remove too much insulation, as this can interfere with the electrical connection.
Once the wires are stripped, crimp connectors can be used to join the tail light wires together. Crimp connectors are designed to create a secure and reliable electrical connection. Insert each wire into the appropriate connector and use crimping pliers to secure it tightly. Ensure that each connection is tight and free from any loose wires or exposed metal.
Testing The Connection
With the wires properly connected, it is essential to test the tail light connection to ensure everything is functioning as it should. Begin by turning on your vehicle’s lights and performing a visual inspection of the tail lights to verify they are illuminated.
Next, test each function individually. Activate your vehicle’s brake lights, turn signals, and parking lights while observing the tail lights. Additionally, have someone assist you by checking the functionality of each tail light while you operate the corresponding functions from inside the vehicle.
If any issues arise, carefully retrace your steps and double-check the connections. Ensure that all wires are securely connected, and there are no loose or damaged components. In some cases, a fuse may need to be replaced, so it’s crucial to inspect your vehicle’s fuse box as well.
By following this step-by-step guide, you can confidently connect your vehicle’s tail lights with the correct color code. Properly connecting the wires ensures the functionality and safety of your tail lights, providing you with a seamless and hassle-free driving experience.
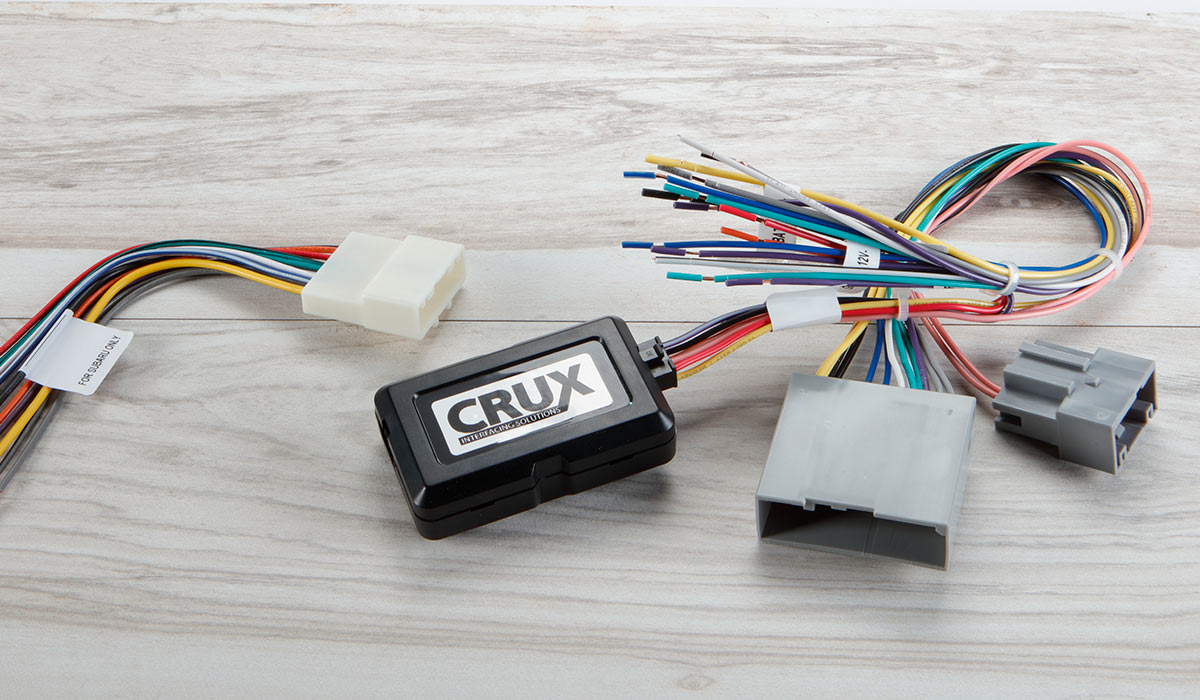
Credit: www.crutchfield.com
Adhering To Legal And Safety Standards
Adhering to legal and safety standards is crucial when it comes to the color code for tail light wiring. Ensuring compliance with vehicle codes and promoting visibility and functionality are key factors in maintaining safety on the road.
Compliance With Vehicle Codes
Adhering to specific vehicle codes is essential for ensuring that the tail light wiring color code meets legal requirements. Different jurisdictions may have varying regulations regarding the permissible colors for tail light wiring. Consulting with local authorities and staying updated on the latest regulations is essential to remain compliant.
Ensuring Visibility And Functionality
Proper color coding of tail light wiring is critical for ensuring optimal visibility of vehicles, especially in adverse weather conditions and low light situations. Using bright and contrasting colors that stand out against the vehicle’s exterior can help improve visibility, thereby enhancing safety on the road. Furthermore, ensuring the functionality of the tail lights is essential to alert other drivers about the vehicle’s movements, promoting safer driving conditions for all road users.
Seeking Professional Help When Needed
When it comes to color code for tail light wiring, seeking professional help when needed is crucial for safety and functionality. Complex wiring systems and inadequate experience can lead to errors and potential hazards, making it essential to turn to a professional for assistance when dealing with tail light wiring.
Complex Wiring Systems
Modern vehicles often have complex wiring systems for their tail lights, involving multiple connections and specific color codes. Understanding the intricacies of these systems requires expertise and experience, as even a small mistake can cause functionality issues and safety concerns.
Inadequate Experience
Attempting to tackle tail light wiring without the necessary experience can result in errors and complications. Without a clear understanding of the color codes and wiring diagrams, individuals may inadvertently cause damage to the vehicle’s electrical system, leading to costly repairs and potential safety risks.
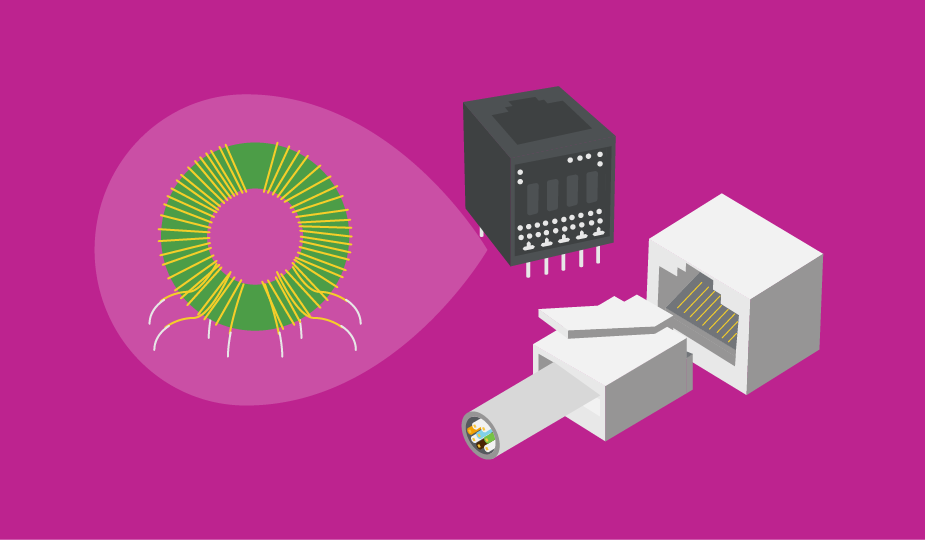
Credit: www.cuidevices.com
Frequently Asked Questions Of Color Code For Tail Light Wiring
What Is The Color Code For Tail Light Wiring?
The color code for tail light wiring varies, but the most common is white for ground, brown for tail lights, yellow for left turn/brake lights, and green for right turn/brake lights. Refer to your vehicle’s manual or consult a professional for exact color codes.
How Do I Wire Tail Lights?
To wire tail lights, connect the white wire to the ground, the brown wire to the tail lights, the yellow wire to the left turn/brake lights, and the green wire to the right turn/brake lights. Use connectors or solder the wires together, ensuring a secure and reliable connection.
Can I Use Any Color Wire For Tail Lights?
It is recommended to follow the standard color code for tail light wiring. Using the correct colors ensures compatibility and helps others understand your vehicle’s lighting system. However, it is crucial to consult your vehicle’s manual or an expert for the specific color code applicable to your vehicle.
Conclusion
To sum up, understanding the color code for tail light wiring is crucial for vehicle safety and proper functioning. By following the standardized color scheme, you can easily identify the corresponding wires and ensure a smooth electrical connection. Remember, red indicates the brake lights, yellow represents the turn signals, and white signifies the reversing lights.
Familiarize yourself with these color codes to successfully install and troubleshoot your tail light wiring. Safe driving starts with properly functioning lights!